How to Perform HP Laptop Backlight Repair: A Comprehensive Guide
Is your HP laptop's backlight not working as expected? Perhaps you're struggling with a dim display or a black screen when you turn on your laptop. Don't worry; we've got you covered! In this article, we'll delve into the world of HP laptop backlight repair, providing you with a comprehensive guide to troubleshoot and fix the issue on your own.
Understanding the Backlight Issue on Your HP Laptop
The backlight is a crucial component of your laptop's display, and when it fails, it can be frustrating. Fortunately, most HP laptops have a replaceable backlight, which means you can repair or replace it yourself. In this article, we'll walk you through the steps to diagnose and fix the backlight issue on your HP laptop.
Common Causes of Backlight Failure on HP Laptops
- Moisture damage: Excessive moisture can seep into your laptop and damage the LCD panel or backlight.
- Pressure damage: Dropping your laptop can cause pressure damage to the LCD panel, leading to backlight failure.
- Backlight issue: A faulty backlight or a blown fuse can prevent your display from lighting up.
- LCD panel defect: In some cases, the LCD panel itself may be defective, leading to backlight failure.
Diagnosing the Backlight Issue on Your HP Laptop
To diagnose the backlight issue, you'll need to determine whether the problem is external or internal. If the issue is external, it may be due to a loose connection or a damaged display cable. If the problem is internal, it could be due to a faulty backlight, a blown fuse, or an LCD panel defect.
Tools and Materials Needed for Backlight Repair
- Screwdriver: You'll need a Phillips screwdriver to remove the back panel of your laptop.
- Torx screwdriver: Some laptops may require a Torx screwdriver to remove the display bezel.
- Plastic spudger: A plastic spudger can help you pry open the display bezel.
- Antistatic wrist strap: This is essential to prevent static electricity damage to your laptop's components.
- Replacement backlight: You'll need a replacement backlight that matches your laptop's specifications.
Step-by-Step Guide to HP Laptop Backlight Repair
Now that you've diagnosed the issue and gathered the necessary tools and materials, it's time to start the repair process. Here's a step-by-step guide to help you replace the backlight on your HP laptop:
Removing the Back Panel and Display Bezel
Start by removing the back panel of your laptop using a Phillips screwdriver. Next, use a Torx screwdriver to remove the display bezel. Be careful not to damage the display cable or the LCD panel.
Disconnecting the Display Cable
Once you've removed the display bezel, you can disconnect the display cable from the motherboard. Be careful not to damage the cable or the connector.
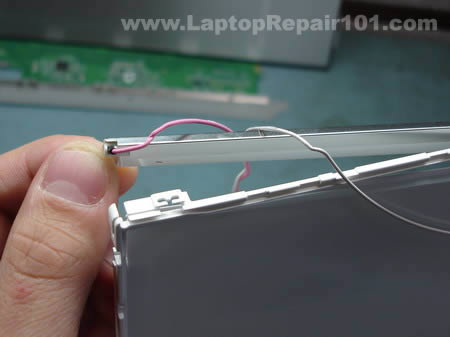
Removing the Backlight
With the display cable disconnected, you can now remove the backlight from the LCD panel. Be careful not to damage the backlight or the LCD panel.
Installing the New Backlight
Now that you've removed the old backlight, it's time to install the new one. Make sure to match the replacement backlight with your laptop's specifications.
Reassembling the Laptop
Once you've installed the new backlight, you can now reassemble the laptop. Make sure to reconnect the display cable and replace the back panel and display bezel.
Conclusion
HP laptop backlight repair can be a challenging task, but with the right tools and materials, you can fix the issue on your own. Remember to be careful when handling your laptop's components, and take your time to avoid any damage. If you're not comfortable with the repair process, it's always best to consult a professional. Good luck with your HP laptop backlight repair!


