Mastering the Art of Basic Tie Tying Techniques
Are you struggling to tie a Tie? Do you want to impress your colleagues with your professionalism? Look no further! In this comprehensive guide, we will walk you through the basic tie tying techniques that will take your neckwear game to the next level.The Importance of Basic Tie Tying Techniques
Tying a tie is an essential skill for men, and it's not just about looking stylish; it's also about confidence and professionalism. A well-tied tie can make a big difference in how people perceive you, whether it's in a formal or informal setting.Basic Tie Tying Techniques: The Four-in-Hand Knot
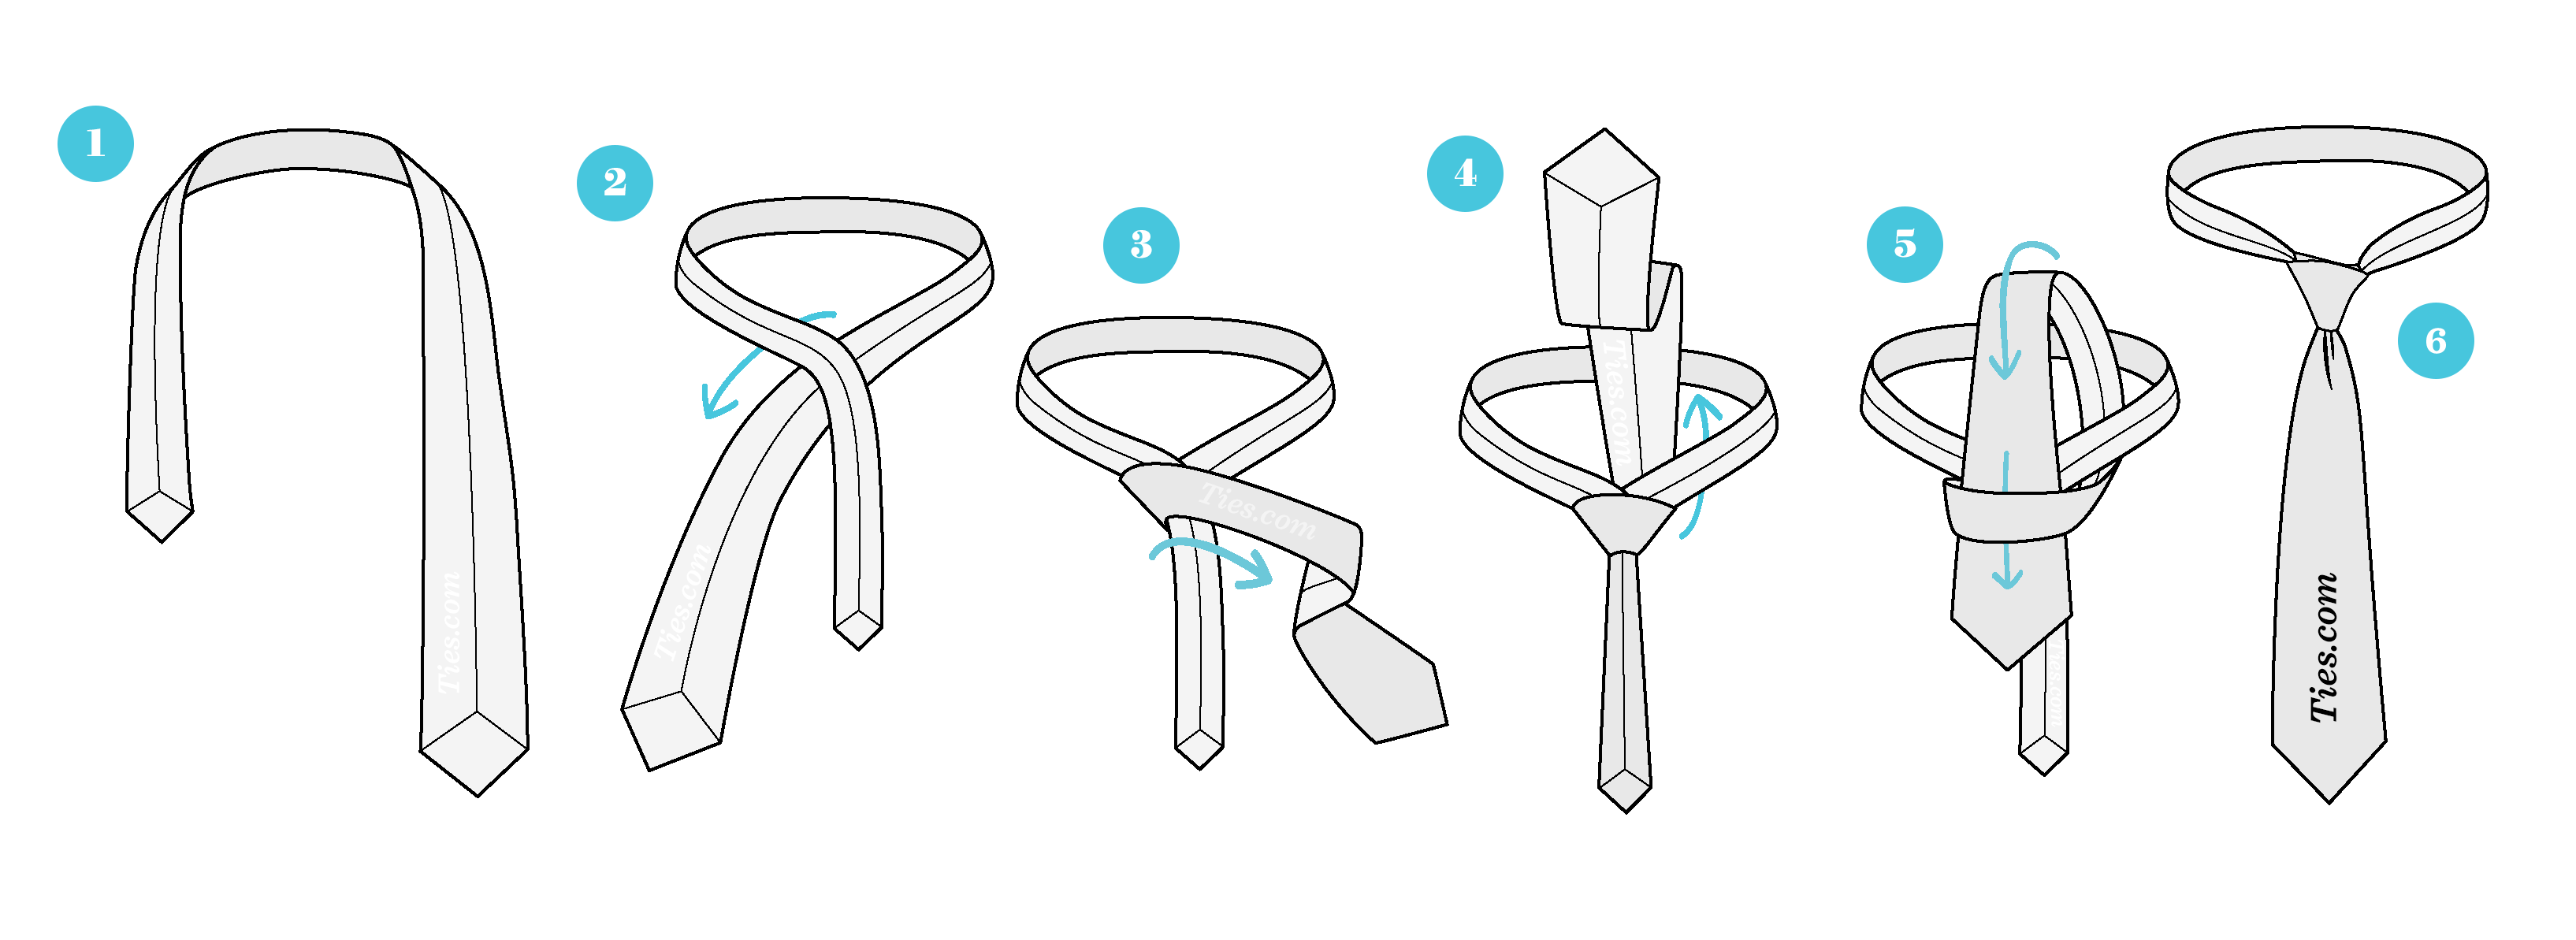
The Four-in-Hand knot is the most common and simplest way to tie a tie. It's a great starting point for beginners, and it's a versatile knot that works with most collared shirts.- Start by facing a mirror and standing up straight.
- Place the tie around your neck with the wide end on your left side and the narrow end on your right side.
- Cross the wide end over the narrow end, so that it forms an "X" shape.
- Take the wide end and pass it behind the narrow end.
- Bring the wide end up and through the loop that you just created in step 3.
- You should now have a knot starting to form. Pull the wide end gently to tighten the knot.
Basic Tie Tying Techniques: The Half-Windsor Knot
The Half-Windsor knot is a bit more challenging than the Four-in-Hand, but it's still a great option for beginners. It's a bit wider than the Four-in-Hand, so it's perfect for spread-collared shirts.- Start by facing a mirror and standing up straight.
- Place the tie around your neck with the wide end on your left side and the narrow end on your right side.
- Cross the wide end over the narrow end, so that it forms an "X" shape.
- Take the wide end and pass it behind the narrow end.
- Bring the wide end up and through the loop that you just created in step 3.
- Take the wide end and pass it behind the narrow end again.
- Bring the wide end up and through the loop again.
- Pull the wide end gently to tighten the knot.
Basic Tie Tying Techniques: The Windsor Knot
The Windsor knot is a bit more challenging than the Half-Windsor, but it's a classic and elegant knot that's perfect for formal events.- Start by facing a mirror and standing up straight.
- Place the tie around your neck with the wide end on your left side and the narrow end on your right side.
- Cross the wide end over the narrow end, so that it forms an "X" shape.
- Take the wide end and pass it behind the narrow end.
- Bring the wide end up and through the loop that you just created in step 3.
- Take the wide end and pass it behind the narrow end again.
- Bring the wide end up and through the loop again.
- Take the wide end and pass it behind the narrow end one more time.
- Bring the wide end up and through the loop again.
- Pull the wide end gently to tighten the knot.
Basic Tie Tying Techniques: The Eldredge Knot
The Eldredge knot is a bit more challenging than the Windsor, but it's a unique and stylish knot that's perfect for formal events.- Start by facing a mirror and standing up straight.
- Place the tie around your neck with the wide end on your left side and the narrow end on your right side.
- Cross the wide end over the narrow end, so that it forms an "X" shape.
- Take the wide end and pass it behind the narrow end.
- Bring the wide end up and through the loop that you just created in step 3.
- Take the wide end and pass it behind the narrow end again.
- Bring the wide end up and through the loop again.
- Take the wide end and pass it behind the narrow end one more time.
- Bring the wide end up and through the loop again.
- Take the wide end and pass it behind the narrow end again.
- Bring the wide end up and through the loop one more time.
- Pull the wide end gently to tighten the knot.


 - wikiHow")


