How to Set Up a VPN on Chromebook: A Comprehensive Guide
Connecting to a private network on your Chromebook can be as simple as setting up a Virtual Private Network (VPN) connection. Google Chrome OS provides a secure and convenient way to protect your online activity, but setting up a VPN on your Chromebook may require a bit more effort. In this article, we will walk you through the process step by step, covering four different methods to set up a VPN on your Chromebook.
Method 1: Using Chrome Browser Extension
The Chrome browser extension method is a great way to set up a VPN on an older Chromebook version that doesn't support Android apps. Follow these steps to get started:
- Open the Chrome Web Store and search for a VPN extension.
- Choose a reputable VPN provider and click the "Add to Chrome" button.
- Allow the extension to integrate with your Chrome browser.
- Activate the VPN extension to start encrypting your internet traffic.
Method 2: Using Android Apps
Many VPN providers offer dedicated Android apps that can be installed on your Chromebook. This method is ideal for users who prefer a more traditional VPN experience. Here's how to set up a VPN using an Android app:
- Enable the "Install Unknown Apps" option in your Chromebook's settings.
- Visit the Google Play Store and download the VPN app from a reputable provider.
- Install the app and launch it on your Chromebook.
- Enter your VPN provider's credentials and connect to a VPN server.
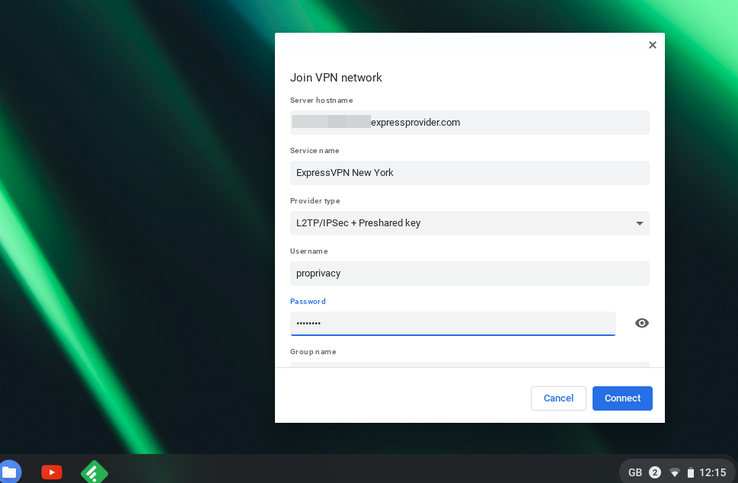
Method 3: Manual Configuration via Chrome OS Settings
For VPNs that don't offer a Chrome extension or Android app, you can set up a VPN manually. This method requires you to access the Chrome OS settings. Follow these steps:
- Go to Chromebook settings.
- Click on "Network" and select "Add connection."
- Choose "OpenVPN / L2TP" and enter the VPN server address, username, and password provided by your VPN provider. li>Click "Connect" to establish the VPN connection.
Method 4: Using a Third-Party App
Another way to set up a VPN on your Chromebook is by using a third-party app. This method is ideal for users who prefer a more user-friendly interface. Here's how to do it:
- Visit the Google Play Store and download the VPN app from a reputable provider.
- Install the app and launch it on your Chromebook.
- Enter your VPN provider's credentials and connect to a VPN server.
Choosing the Right VPN Provider
When selecting a VPN provider, consider the following factors:
- Server locations: Choose a provider with servers located in your desired region.
- Speed: Opt for a provider that offers fast speeds and low latency.
- Security: Look for a provider with robust security features, such as encryption and a no-logs policy.
Conclusion
Setting up a VPN on your Chromebook is easier than you think. With four different methods to choose from, you can select the one that best suits your needs. Remember to choose a reputable VPN provider that meets your requirements, and enjoy the benefits of a secure and private online experience.
As the role of VPNs continues to grow, it's essential to stay informed about the best practices for setting up and using a VPN on your Chromebook. By following this guide, you'll be well on your way to protecting your online activity and staying safe on the internet.
 - Chromebook Help")
")


")


